If you’ve ever fought with PowerPoint to get a slide object in exactly the right place, you’ll definitely want to know a few tricks you can use to win that battle.
Use the Keyboard to Position Objects
One super useful trick is to use the arrow keys on your keyboard to position objects instead of dragging them with your mouse. With an object selected, the arrow keys will “nudge” the object left, right, up or down, just a little bit at a time, so you can get it EXACTLY where you want it. If you want to be even more precise, hold the CTRL key down while you use the arrow keys and you’ll have even more control.
The CTRL+ARROW trick nudges the object in a 1-pixel increment. What 1 screen pixel represents relative to the slide area depends on the zoom percentage. When zoomed in to 400%, 1 screen pixel is a relatively small nudge distance on the slide. When zoomed out to 25%, 1 screen pixel is a relatively larger nudge distance on the slide. Therefore, if you want to use smaller nudge distances to refine the placement of objects on a slide, zoom in and use the CTRL+ARROW keys.
Specify Exact Positions
Using the Position function gives you very precise control of where your slide objects are located. To manually specify a location, just right-click the object, select Size and Position… and click on the Position tab. From here you can easily specify the horizontal and vertical position for the selected object ( In inches up to two decimal points.)
Use the Alignment Tools
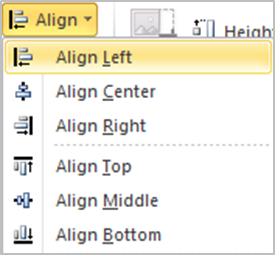
If you want to perfectly align things on your slide let PowerPoint’s alignment tool do the job for you. Just select all the objects you want to align and then use the Align button on the Format tab to tell PowerPoint what type of alignment you want.
Do you use these tricks? What other ones do you find helpful when working with your PowerPoint slide?


Great CTRL+Arrow tip, thanks. Also found (by accident) that SHIFT+Arrow resizes.
LikeLike
How do you do it on a mac?
LikeLike
Pretty much the same except us the “Command” key
LikeLike